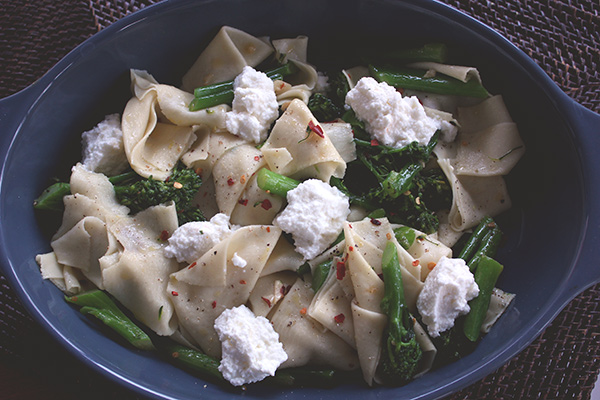
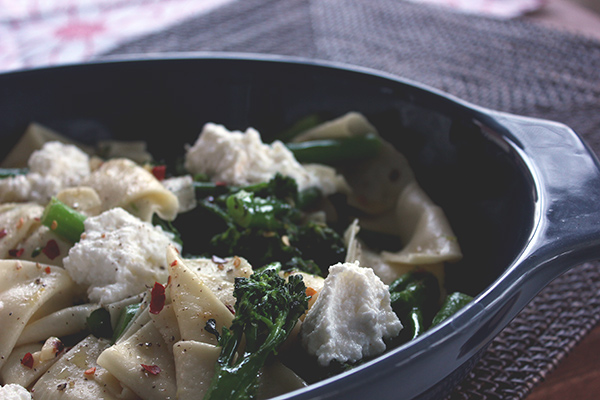
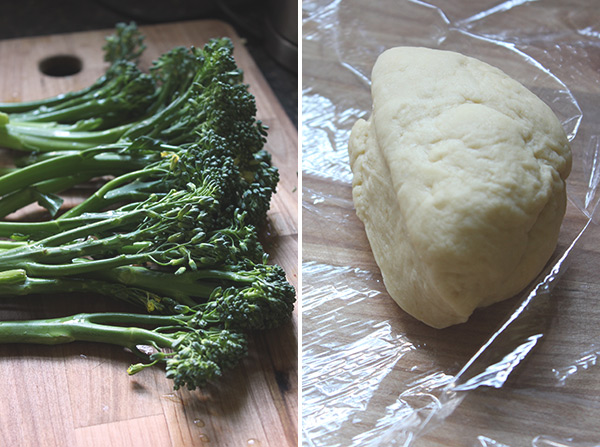
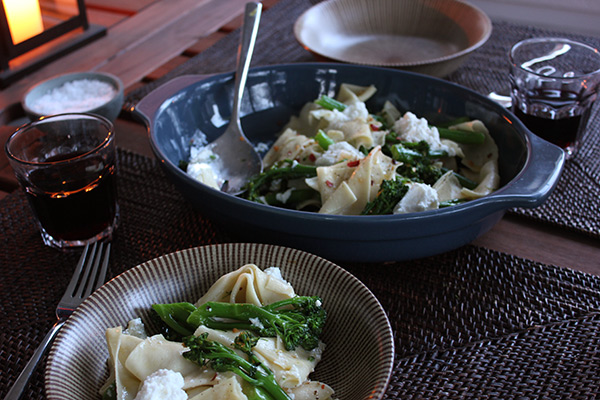
Homemade pasta handkerchiefs with garlic broccolini and ricotta
In Spring 2007, Brett and I made fresh pasta for the first time. It was my first year of graduate school, and I lived in a dangerous and isolating part of Los Angeles that meant it wasn’t a good idea to leave my apartment after dark. (And I never did!) Brett was still in Claremont finishing his last year of college, and a complicated combination of our class schedules and the location of our internships meant that each of us separately drove or took transit back and forth between Claremont and Los Angeles every single day, a commute that could take anywhere from 45 minutes to 2.5 hours each way. It was a particularly stressful spring, as we criss-crossed eastern Los Angeles County, as our coursework swelled, and as we both tried to find jobs and decide where we’d get our first apartment together. The weight of the semester began to creep into every moment, and as an escape we began taking on cooking projects. We baked bread for the first time; we made croissants; we made fresh pasta. We took entire evenings off and drank cheap bottles of wine and made recipes we were sorely underprepared to make, lacking the tools, experience, or space required.
The first time we made fresh pasta, we rolled out the dough with a long bottle of cheap riesling, which stood in for the rolling pin we didn’t have (which itself would have been standing in for the pasta machine we didn’t have). We kneaded the dough by hand for what felt like hours and rolled out sheet after sheet on the two square feet of counter space in my kitchen, and by the time the meal was ready to eat, many hours after we thought we’d be eating, we flopped into our chairs utterly exhausted. I have a picture of the meal, and among the time-telling ephemera on the table (flip phone!) I can see immediately how much work it must have taken to make that bowl of pasta. I remember the next time we made it, and based on the apartment and who was there I know it was at least two years later. We again rolled out the dough with that same bottle of whine (which served as our rolling pin for quite a few years), overcompensating and rolling out the pasta far too thin, and when we again flopped into our chairs many hours too late, I remember thinking I’d probably never make pasta again.
But I did, again and again, and these days we have it down. I wish I could go back and tell my 22-year-old self that it didn’t have to be so difficult, and I’m more than happy to transmit that message to all of you right now. Fresh pasta! It doesn’t have to be so difficult. A food processor and a pasta machine make it fairly quick and easy work, and the finished product is absolutely worth the effort. Fresh pasta is rich and buoyant, a completely different experience than the dried grocery store variety – even the high-end brands – and the satisfaction that comes with having made something with your hands can fill in any of the meal’s empty spaces.
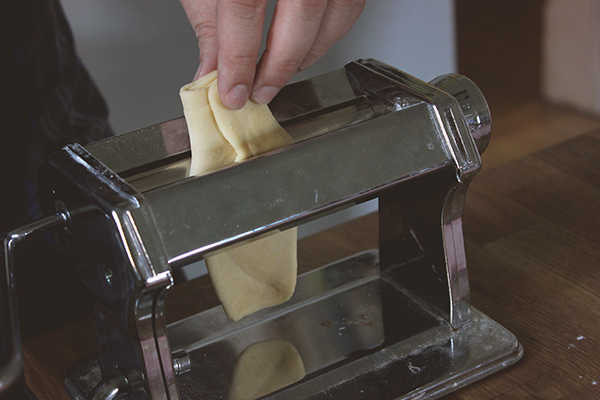
If you want to be a bit fussy about it, which I absolutely do not hold against you, there are things to be said about the type of flour you use and about rolling it out by hand and about getting your hands into the dough to knead it into submission. But if you’re looking for more fresh pasta in your life and need a place to get started, all you need is a bit of all-purpose flour, a few eggs, a food processor, and a pasta machine. Using a food processor reduces the mixing and kneading time down to just a few minutes, and the pasta machine will make quick and beautiful work of rolling out the dough to even the most paper-thin sheets. I’m a person who loves to have my hands on the food as much as I can, but to be honest I’ve gotten such a better product from using these two machines that I don’t really want to look back. For years I’ve had my eyes on the KitchenAid automatic pasta roller attachment for my stand mixer, but really the Norpro one we found years ago at Ross Dress for Less (!!!) for $17.99 (!!!) works perfectly fine.
And my favorite secret about fresh pasta? The less work you put into cutting it – the more basic the shapes, if you can even call them that – the more on-cue it seems. In this recipe, for instance, rolled out pasta sheets are cut roughly into squares, with no attention paid to straight lines or equal sizes. We call them “pasta handkerchiefs” and move on with our meal, and it all comes together as it should. Wide strips become pappardelle, or with a bit of filling and forming the sheets of pasta can easily become ravioli or agnolotti or caramelle.
I timed it once in preparation for teaching fresh pasta in a class, and from flour-to-pot the process took 1 hour for me to do alone, including 15 minutes for the dough to rest and 30 minutes for the cut pasta to rest. It will likely take you a few times to get it quite this quick, but considering that 45 minutes of that time can be spent doing other things – whether preparing the other parts of the dish or doing other things entirely – making fresh pasta suddenly becomes a lot more reasonable.

As with dried pasta, there is an infinite number of things you can do with fresh sheets of pasta. This winter I made fresh pasta fairly often to use for lasagna, which requires even less cutting than with handkerchiefs, and I’d guess that most commonly we make fresh pasta into pappardelle with ragu or roasted vegetables or some other sort of basic sauce.
If you’re looking for something to do with homemade ricotta, which was exactly the inspiration for this meal, or for a great thing to eat on your first outdoor meal of the season, this particular recipe will serve you well.
Pasta handkerchiefs with garlic broccolini and ricotta
Makes 2 main servings, easily scalable
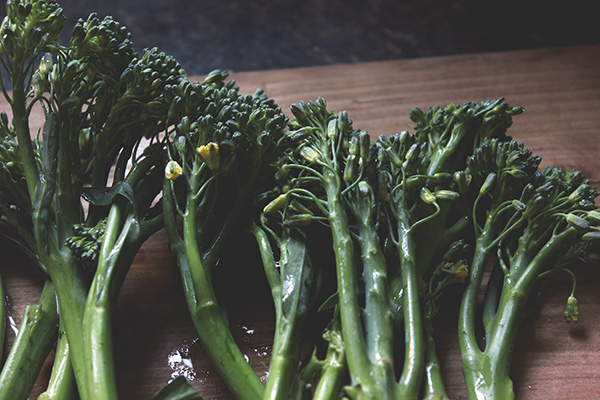
- 8 oz. broccolini (broccoli rabe works well here too)
- 1/4 lb. (4 oz.) fresh pasta handkerchiefs (see recipe below), OR uncooked lasagna sheets (conventional or no-boil)
- A few Tbsp. olive oil
- 3 garlic cloves, peeled and sliced or roughly chopped
- A pinch or two of red pepper flakes
- 1 small lemon for zest and juice
- Salt and pepper
- Around 1/2 cup room temperature ricotta (homemade ricotta is perfect here, especially if made the day before and stored in the fridge overnight, where it will firm slightly)
– Cook broccolini While preparing other ingredients, set a large pot of heavily salted water to boil. You’ll use this water to cook the broccolini and the pasta. Rinse the broccolini and cut each stalk into 3-4 sections or as needed to make comfortable bite-size pieces. Heat a large skillet over medium heat and add enough oil to lightly coat the bottom. Add the garlic and a pinch or two of red pepper flakes and cook over medium-low to medium heat, stirring occasionally and taking care not to burn or brown the garlic. When the water is boiling, add the broccolini and cook until mostly tender, around 3-4 minutes. Remove the broccolini using a slotted spoon or tongs and add it directly to the hot pan with the oil and garlic. Keep the pot on high heat and bring the water back to a boil before adding the pasta (see next step). Cook the broccolini until the cooking water has evaporated (or longer, if needed to make the it tender). Add the grated zest from half the lemon and salt to taste, and turn off the heat.
– Cook the pasta Add the cut fresh handkerchiefs or uncooked lasagna sheets to the boiling salted water and cook until tender – about 90 seconds for the fresh pasta or as directed on the package for the lasagna sheets. Drain, and if using the lasagna sheets cut them roughly into squares.
– Assemble Toss the pasta squares with the broccolini in the skillet, squeezing in a bit of juice from the lemon and adding salt and freshly ground black pepper to taste, plus a bit more red pepper flakes if desired. Put in a serving dish or serve onto plates and add rough spoonfuls of fresh ricotta, nestling it amongst the pasta and broccolini.
Fresh pasta in the food processor
Makes approximately 1/2 lb. of pasta, enough for 3-4 main dish servings
Note: You can make larger and smaller batches of this dough, but I find that differently-sized batches can be a little fussy in terms of getting the right flour-egg ratio. I have doubled this recipe without too much difficulty, but I’d suggest trying this quantity a few times before scaling.
- 1 slightly heaping cup all-purpose flour, plus more for adjusting
- 2 large eggs
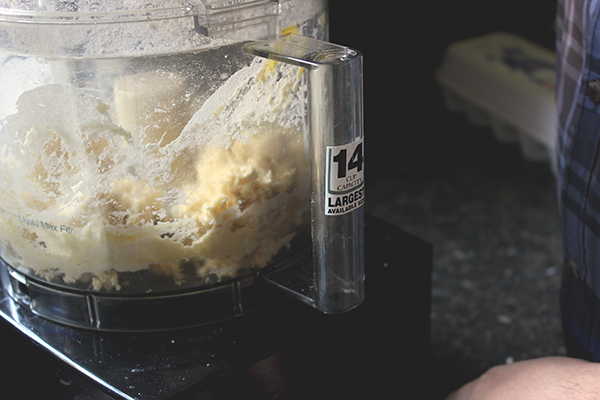
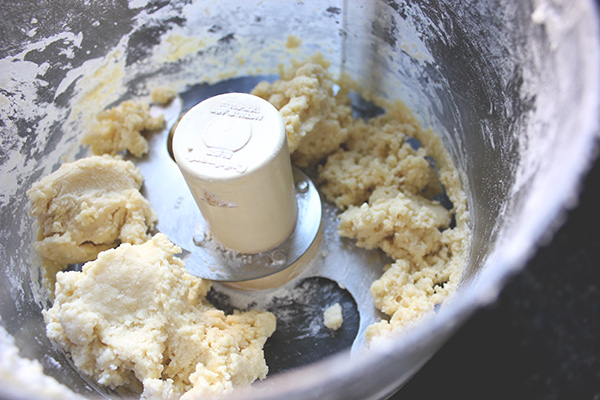
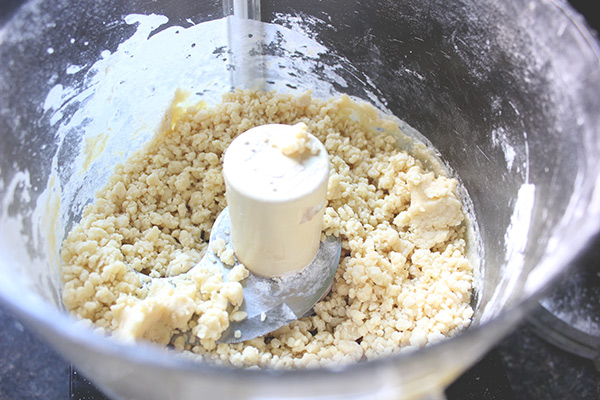
– Make dough Pour flour into the bowl of a food processor fitted with the blade. Add the eggs and run the machine until the two come together. Feel the dough – if it feels quite sticky, add a heaping teaspoon of flour and run the machine again. Repeat this process as needed until the dough feels more springy than sticky – it may still feel a little tacky and adhesive, but it shouldn’t stick to your fingers. The form the dough takes can differ batch-to-batch, but I’ve found that it usually forms mostly into a large ball when I first process it, then once I’ve added enough flour it breaks back into tiny bits (see pictures above). To note, once or twice I’ve ended up not having to add any extra flour – that’s okay. If the dough feels at all crumbly or like it won’t hold together into a mass, it’s probably too dry – add another egg and a another scant half cup of flour and increase your overall batch size.
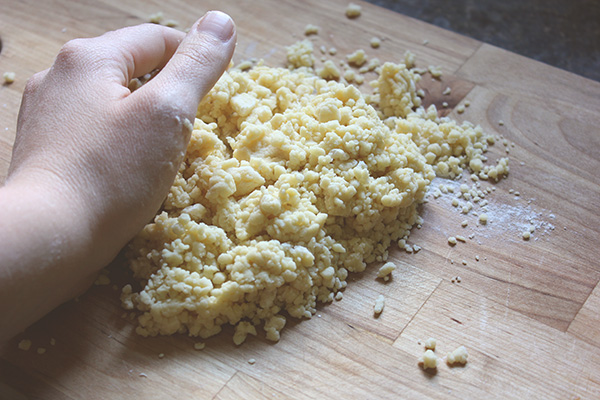
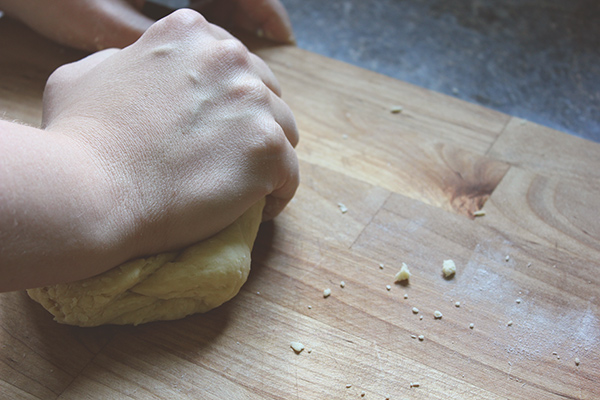
– Knead and rest dough When the dough is the desired texture, put it on a counter, cutting board, or other work surface. Knead for about 1 minute, pushing it against the surface with the heel of your hand and using your entire hand to warm the dough as you work it. Wrap the dough in plastic and let sit at room temperature for 15 minutes to an hour. (For the recipe above where you only need half the dough, you can cut it in half at this point. Any unused dough or dough you want to roll out in the future can be wrapped well in plastic and frozen for up to 3 months at this point, if desired – thaw for 24 hours in the refrigerator and for an hour at room temperature before rolling out.)
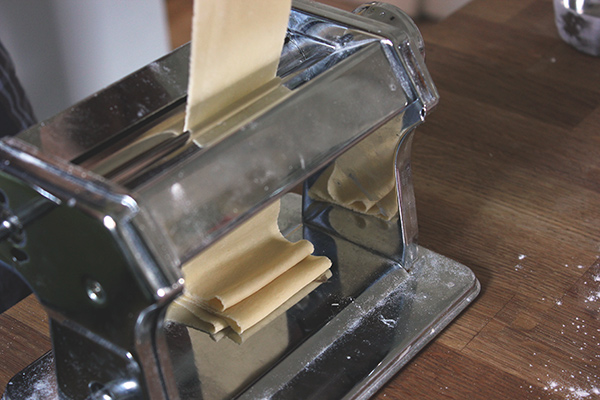
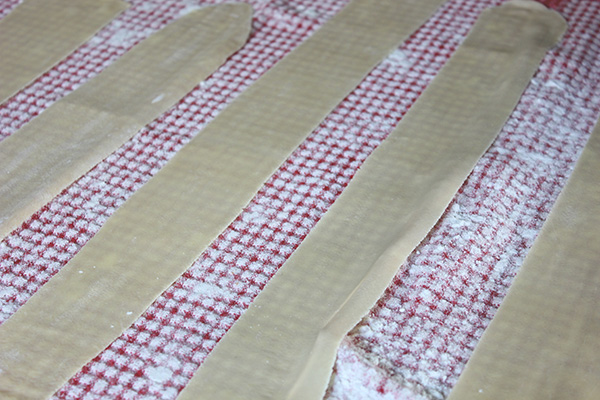
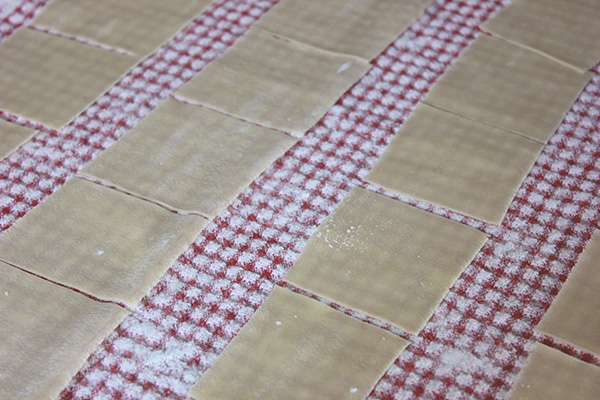
– Roll out pasta Spread clean kitchen towels over a work surface, sprinkling them lightly with flour. Set your pasta roller at the largest opening. Cut the ball of dough into 6 pieces and pat each into a flat disk. Roll the first disk through the pasta machine. Fold it in thirds like a letter and roll through again (fold-down or open edge-down is fine). Repeat for a third rolling. Complete this process on all other pieces of dough. Now each piece will be rolled through the rest of the settings on your roller. Let the pieces rest on the kitchen towels between rollings, putting all pieces through setting #2 before starting #3, etc. If the pieces get too long, you can always cut them in half and continue rolling. Sheets may roll out quite wide or quite narrow, and either is fine. (In the pictures above the pieces rolled out quite narrow.) Roll through progressively thinner settings until you reach your desired thickness – my machine has 9 settings, and I usually roll until #8 unless I want very thin pasta. Let the pieces dry on the towels for 15-30 minutes before cutting and using.
– Cut pasta For handkerchiefs, cut the pasta roughly into squares or rectangles.
Making ahead/storage: As noted above, unrolled pasta dough can be wrapped and frozen for up to 3 months. Rolled and cut pasta can also be prepared ahead of time – let the pieces dry for 15-30 minutes, then layer with kitchen towels and store at room temperature for up to 2 days or don’t include the kitchen towels and wrap in plastic or a zip-top plastic bag and freeze for up to 3 months. Frozen cut pasta can go directly into boiling water to cook.


This looks amazing, except now all I want to do is find a way to do a GF version of this.
I’ve been hearing lots about homemade quinoa pasta lately … worth a try!
Also, that first time we made fresh pasta we had so little table/counter space, we set the noodles to dry on our tiny 8-bottle IKEA wine rack.
That’s right! I’m so glad we don’t have to do that any more.
Looks amazing! enough though I don’t own a rolling pin or stand mixer, I still want to try making fresh pasta. wine bottle totally works!